


|
Decorate With Special Plaster Interior Textures
 Time for a Do-It-Yourself Plaster Project! Does this describe you? You are building a new home, your dream home, in a Spanish or Southwestern (US) style.
You have lots of decisions to make, regarding both the basic structure ofyour house and the decorative aspects of its interior. Have you given any thought to the wall and ceiling textures? The Southwestern flavor of your house lends itself well to certainhand-applied wall and ceiling textures. Often called "Spanish" or"Mediterranean", these are unique and attractive compliments to your windowtreatments, your wall art and your furnishings. It may be that your general contractor is already knowledgeable in thisarea, and can point you where you might want to go with this. But I would also like to offer you some personal suggestions to increaseyour decorating options.
In my years of work in the homebuilding industry as a subcontractor, I amusually consulted by the builder or homeowner regarding the texturizing ofinterior walls and ceilings. Some situations lend them selves nicely to a smooth, no texture,effect. But more often than not, clients want a textured interior, and the choicesare many, although certain textures tend to be chosen more often. In response to customer need, I developed a number of textures, rangingfrom very light, soft ones to rougher more abrasive textures, in a varietyof patterns. Some in particular fit well in a Southwestern home style. I will show you a couple of these. You can in turn show them to yourcontractor. Or ... Maybe you have a strong do-it-yourself streak. You might want to try theseout and see if they work for you. Texturing can be a lot of fun. You get to take this clean "mud" and playwith the tools and experiment with the results. I have had a number ofpeople over the years pay me to teach them how. Some proved to be prettyadept.
Now, let's start with ideas for a ceiling texture. Here is one version ofwhat I call a "Spanish brocade." (application photos below) This comes in two basic versions: with and without sand. I prefer thesanded version, because it enables me - the applicator - to give a uniformthickness to the individual "islands."
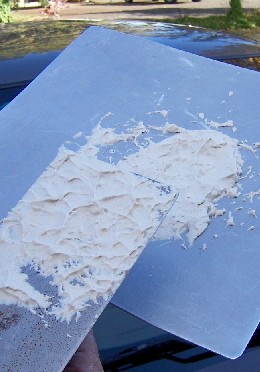 It goes like this. You want a mix that is fairly thick, thatwill pour but not easily. About one-third sand, two thirds mud. (You aremixing your own texture compound from powder, or using thinned regular allpurpose joint compound). Use #30 mesh clean white quartz sand. Place about a cup of texture mud on your plasterer's hawk. Spread it out alittle, then pat your trowel into the mud, leaving little peaks on theblade.
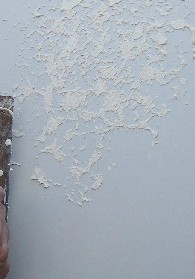
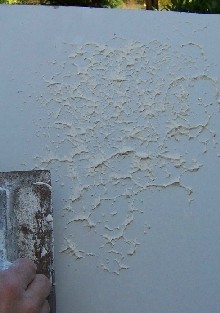 You are transferring the peaks to the ceiling. Continue doing this until you have an area maybe two or three feet square. Now, using a six inch wide drywall taping knife, very gently flatten the peaks, creating the "islands." If you find that you are moving fairly fast, you may want to do a larger area on the ceiling before you flatten the peaks. In any case, you want the drywall or plaster ceiling to have time to suck some of the extra moisture from your texture and stiffen it. This makes it easier to flatten properly.
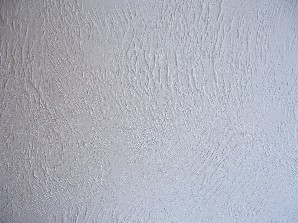
 Another texture I often do is a rough sanded plaster-looking applicationwith some swirling in it. Most appropriately, it is a wall texture. Howmuch swirl you may want to do is up to you. Trowel the surface with a thin layer of the texture material, then createthe swirl effects by varying strokes over the area with the trowel heldflat and with light pressure. You can leave the roughness in place when you are done, or flatten it somea little later with a six inch drywall taping knife. You can play with the trowel and get different subtle results. In addition,the thickness of the mix will yield different effects. It's usually a goodidea to experiment on a scrap of drywall, an old garage wall or whatever -to get something you like, before you put it on the wall for real.
 Have fun, and remember ... this is a learning experience. You don't haveto master it immediately.
This article was contributed by Edwin Brown. If you would like to learn other interesting and educational facts about attracting plaster for your walls and ceilings, then please visit his website at: Plaster Wall-Ceiling Solutions
 Â Â 
|
